Carving intricate designs in Western Red Cedar can be challenging. Learn do's and don'ts in carving this soft, brittle wood...
In the sign industry, Western Red Cedar sign blanks are a popular choice
because this affordably-priced wood is dimensionally stable and resists insects
and decay. As a substrate for exterior signage, cedar can provide up to thirty
years outdoor durability.
Its workability also makes Western Red Cedar an excellent choice for sign
makers. Because it is a soft wood, even a novice craftsman can easily carve
incised letters in it. However, carving more intricate designs is usually more
challenging. Although the wood is soft, it is also very brittle wood and will chip
or tear out very easily. But with a
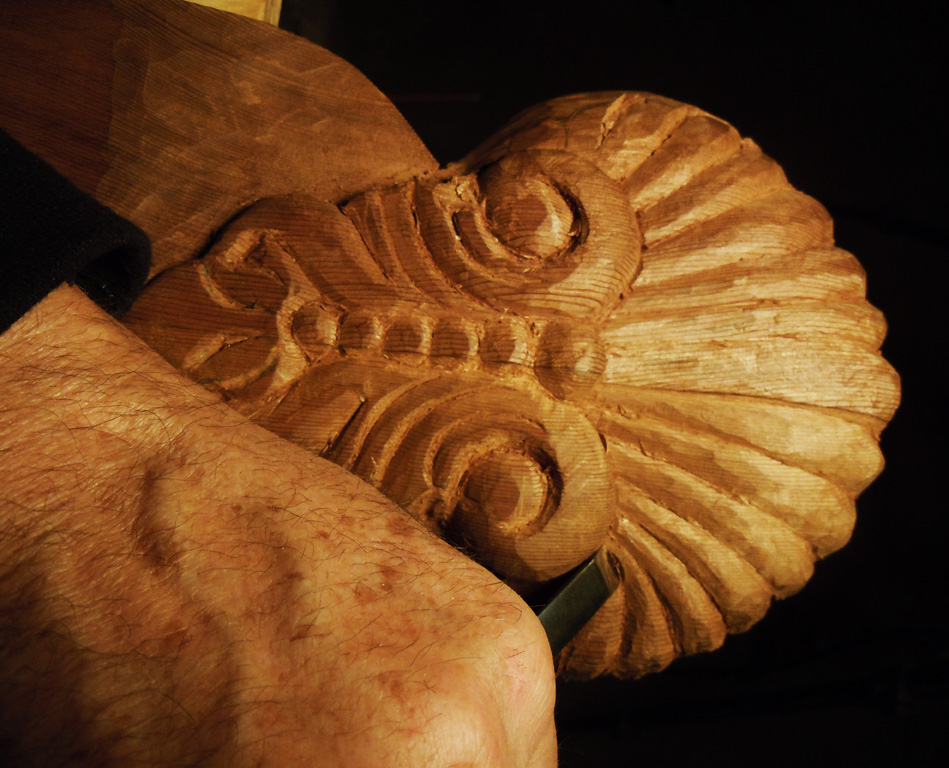
little practice and by using sharp tools and proper woodcarving technique, Western
Red Cedar will hold moderate detail as shown in the photograph below.
 |
|
With a sharp gouge and
good technique, Western Red Cedar will hold moderate detail.
|
When woodcarving cedar, here are some tips, which can help you in your next
project:
·
Your gouges must be
razor sharp. Dull blades will tear the wood. Gouges that have a nick on the
cutting edge will also mar the surface of the wood leaving a noticeable white
scratch in the wood. If your blades are sharp and if you use proper cutting
technique, the wood should have a very shiny appearance as you are carving. Conversely,
the surface of the wood will appear dull and in some cases rough, if you carve
with a dull gouge or are cutting against the grain.
·
Be mindful of the grain
direction when carving. The good news is that Western Red Cedar has a very
straight grain. But if the blade of the gouge goes against the grain, the wood
will tear or chip easily, as previously stated. When you are carving an intricate
design, use very shallow cuts, shaving the surface of the wood. If the wood
starts to tear out, stop immediately and change the direction of the cut.
· Never use a stop cut.
Many woodcarvers will outline their
designs using what is called a “stop cut”. Using a gouge or chisel with a
mallet, a cut is made straight down into the wood, perpendicularly piercing across the fibers of the wood. With some hardwoods this can
give you a very nice clean edge on the perimeter of the design. Because Western Red
Cedar is a very brittle and fibrous wood, stop cuts will crush the fibers of
the wood, causing them to separate or split. Although some woods will not split
when using a stop cut, it is best to avoid this practice all together.
· As you are carving with
a gouge, twist the handle of the tool so the edge of the blade rolls away from
the remaining wood. If the blade digs into the wood, reverse the direction of
how you are twisting the handle. Slightly rolling the handle of the gouge as
you are carving is a good habit to develop as you are learning to carve.

· When carving an
intricate design, the best advice is to use a harder wood with a tight grain, such as mahogany.

As I rough out my design, I am carving at a
45⁰ angle to the grain
of the wood. This gives me a very nice
smooth cut.
 |
| Completed sign after priming, painting and gilding. |
Related Articles
Hingst Art Photo Album
Using a Mini Angle Grinder for Woodcarving
Woodcarving Tool Care
Thinning Paste Wax for Easier Application
Applying a Wiping Varnish to Your Carving
Using Epoxy Clay to Correct Woodcarving Mistakes
Safety Rules for Angle Grinders
Lowering the Cutting Angle of Woodcarving Gouges
Undercutting to Create Drama in Relief Carving

Vinyl Application Videos
Squeegee Technique. Nothing is more basic in vinyl application than the squeegee. But some squeegees work better than others. And there are right ways and wrong ways to use this simple tool. This video clip reviews squeegee selection, squeegee care and squeegee technique. Click to Link
Wet Applications. Dry applications are typically recommended for most vinyl applications. For those exceptions to the rule, this instructional video explains the right way to perform a wet application. Click to Link
Application of Window Graphics. Installing vinyl graphics on glass can be challenging, because the adhesive aggressively grabs onto this high energy surface. Repositioning graphics on window is generally difficult, if not impossible. This instructional video explains how to dry apply window graphics right the first time. It also describes the necessary steps required for surface preparation. Click to Link
Transferring Frosted Window Graphics Films. Because frosted window films are highly textured, transferring cut vinyl graphics can be problematic. This video provides direction in selection of the right application tape and how to apply these films quickly, easily and without problems. Click to Link
3-Step Surface Prep. This instructional video describes how to properly clean the surface of a vehicle before applying pressure sensitive vinyl graphics to a trailer or doing a full wrap of a car or van. This three step surface prep involves detergent washing, solvent cleaning and a final wipe down with IPA. Click to Link
Vinyl Application Over Rivets. Applying vinyl graphics on vehicle surfaces with rivets is challenging for most sign makers. Vinyl failures to these surfaces are all too common. This video demonstrates some tips and procedures, used by professional decal installers, which will make these demanding applications easier and more trouble-free. Click to Link
Vinyl Application to Corrugations. Learn how to apply vinyl graphics to corrugations in a relaxed state. Forcing films into the valleys of corrugations puts too much mechanical stress on the film. Sooner or later, the vinyl will lift or tent in valleys. Click to Link
Applying Air Egress Vinyls. Vinyl films with air egress release liners have almost eliminated bubbles and wrinkles from applied graphics. Air egress release liners with their highly textured surface structure are problematic. Not much will stick to these liners other than the vinyl film. At RTape our best premask solution for air egress liners is a special Conform® tape called 4761RLA. Click to Link

About Jim Hingst: After fourteen years as Business Development Manager at RTape, Jim Hingst retired. He was involved in many facets of the company’s business, including marketing, sales, product development and technical service.
Hingst began his career 42 years ago in the graphic arts field creating and producing advertising and promotional materials for a large test equipment manufacturer. Working for offset printers, large format screen printers, vinyl film manufacturers, and application tape companies, his experience included estimating, production planning, purchasing and production art, as well as sales and marketing. In his capacity as a salesman, Hingst was recognized with numerous sales achievement awards.
Drawing on his experience in production and as graphics installation subcontractor, Hingst provided the industry with practical advice, publishing more than 150 articles for publications, such as Signs Canada, SignCraft, Signs of the Times, Screen Printing, Sign and Digital Graphics and Sign Builder Illustrated. He also posted more than 325 stories on his blog (hingstssignpost.blogspot.com). In 2007 Hingst’s book, Vinyl Sign Techniques, was published. Vinyl Sign Techniques is available at sign supply distributors and at Amazon.
No comments:
Post a Comment